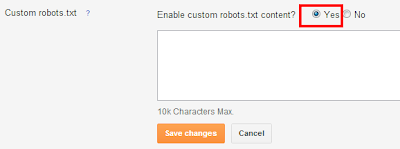
How to Enable robots.txt in Blogger.com:
Enable robots.txt and xml sitemap is very important for a blog or a website to get indexed in major search engines like google, yahoo, bing. Thus, it is very important to have a sitemap for your blog to get indexed. This file is generally named as “sitemap.xml” in most of the cases. It is just like a directory for your blog. In most of the platforms the xml sitemap is automatically generated.
Also see For blog beginner: How to create free blog in blogger blogspot website.
Also see: How to Generate XML Sitemap for BlogSpot or any Blogger Blog
Also see:How to submit blogspot website to Google search console
Also See: How to set custom domain for Blogger BlogSpot website
Also see:How to Enable robots.txt in Blogger.com for blogspot website
Also see: How to set Free domain For your Blogger blogspot website
Blogger’s sitemap
If you are using blogger platform, you does’nt need to generate sitemap manually. It is automatically done by the Crawlers. The crawlers use “Robot.txt” file to generate the sitemap for your blogger. Robots.txt file for your blog will be “yourblog.blogspot.com/robot.txt”, see example here http://googleblog.blogspot.com/robots.txt .
Also see: How to Generate XML sitemap for blogger blogspot
Limitation of blogger Site map menthod than Enable robots.txt method
The main limitation of blogger’s automatically generated sitemap is that, it only generates the sitemap for 26 recent posts. If your blog have more than 26 pages, the sitemap generated will be only for recent 26 posts. the rest of the posts will be missing. Thus, it is not good practice to have such sitemap.
Solution – Generating full sitemap (Enable robots.txt)
Here is solution to the blogger’s sitemap limitaion. To generate full site map you need to change your “robot.txt” file.
- Go to Blogger’s Dashbord, then Settings -> Search preferences. In Crawlers and indexing section, click on edit of Custom robots.txt

- Then enable “Enable custom robots.txt content” to “yes”.

- Now, you need to find the total number of your blog posts. You can refer to your “Post” section of blogger’s dashboard.
- After finding the number of blog posts, paste the following code in “Custom robots.txt” section.
For less than 500 posts :
User-agent: *
Disallow: /search
Allow: /
Sitemap: http://yourblog.blogspot.com/atom.xml?redirect=false&start-index=1&max-results=500For less than 1000 posts :
User-agent: *
Disallow: /search
Allow: /
Sitemap: http://yourblog.blogspot.com/atom.xml?redirect=false&start-index=1&max-results=500
Sitemap: http://yourblog.blogspot.com/atom.xml?redirect=false&start-index=501&max-results=500
For less than 1500 posts :
User-agent: *
Disallow: /search
Allow: /
Sitemap: http://yourblog.blogspot.com/atom.xml?redirect=false&start-index=1&max-results=500
Sitemap: http://yourblog.blogspot.com/atom.xml?redirect=false&start-index=501&max-results=500
Sitemap: http://yourblog.blogspot.com/atom.xml?redirect=false&start-index=1001&max-results=500NOTE : Don’t forget to replace your blog’s url with “yourblog.blogspot.com”.
- After replacing your url save your changes by clicking “Save changes”.


